The Turing machine is a mathematical model developed by the famous mathematician Alan Turing in 1936. The model is generally presented as a way to demonstrate the capabilities of a computer. What a Turing machine can do, a computer can—or will be able to—do. What a Turing machine cannot do, no computer will ever be able to do.
This presentation is accurate but restrictive. In fact, the Turing machine allows us to define what is computable , whether by a computer, a human… or an extraterrestrial, at least if the laws of the universe are the same everywhere.
Thus, when a mathematician creates a Turing machine to perform a task, he demonstrates that the task is computable, and therefore produces a theorem. This theorem can be reused in a larger demonstration.
Educational interest
The operation of a Turing machine is very simple to understand, and learning it only takes a few minutes. However, the programs to be developed require a real capacity for analysis, organization, and anticipation. The few challenges we offer on Actilud are examples of this.
How the model works
The machine appears as a strip of infinite size, divided into boxes. Each box can contain a symbol—a letter, a number, an image, whatever. The number of possible symbols is arbitrary, but finite, and constitutes the collection.

A reading head moves along this strip . It can read a sign, replace it with another, and move one square to the right or left. It is controlled by a program. Its execution speed is infinite (it’s a model!)

The machine has any number of states, but a finite number. By convention, states are symbolized by the letter Q and each state has a default name: q0, q1, q2, etc. The states allow you to select the instructions to be executed. The first state in the list is the default state, in which the machine will be placed when processing starts.
Each instruction is a condition followed by an action, coded as follows:
If the machine is in state q0, and the head reads the sign X , writes the sign Y to it , move the head one square to the left or right (or stay in place), and go to state q1.
An instruction is executed when the conditions are met: the state and the sign match. Once the instruction is executed, the machine goes through the list of instructions again, and so on. The machine stops when no instructions can be executed.
That’s all. When I said the learning curve was short…
An example to understand
Let’s consider a strip containing a number of contiguous sticks. Let’s create a program that will add a new stick to the series.
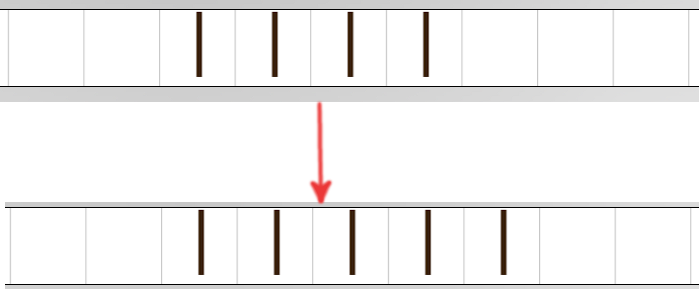
We position the head on one of the sticks and start the machine in state q0. Here are the instructions:
q0, | , | , →, q0
q0, ☐, |, stop
Explanations
If the machine is in state q0 and the head reads a stick (sign “|”), write a stick, move the head to the right (it’s the arrow), stay in state q0. Rewriting the same sign in a box therefore changes nothing to the tape. This is the way to “skim over” a box without modifying it: we rewrite its content.
If the machine is in state q0 and reads a blank , that is to say an “empty” box materialized by ☐, then write a stick, place itself in the stop state. As this state is not defined in the program, the machine stops. The choice of name is not important, we could have called this state something else: q1 , end… To voluntarily stop a machine, just invoke a state that does not exist.
Note that in computer science, an “empty” is always “something”. In Turing’s model, “empty” squares are actually filled with “blank” signs.
As you can see, there is only one active state here. In fact, we can simplify the writing by staying in the same state:
|,|,→
☐,|, stop
What does the machine do? You’ve figured it out: as long as the head is reading a stick, the machine moves the head to the right. As soon as it finds an empty square, it writes a stick there and stops. The machine therefore adds a stick to the end of the serie and stops on that one.
Turing machines on Actilud
The band
Obviously, the strip has a limited size. On Actilud, there are 1000 squares, which already allows for a bit of fun. As a result, our machine can encounter a “fatal” error when the head tries to exit the strip, either to the left or the right. In this case, the entire process stops.
A strip is not “empty.” In fact, when you “erase” the strip, you fill each box with a “blank” sign. Apart from that, the “blank” signs are treated in exactly the same way as the other signs in the collection.
The reading head
No infinite speed! The head can operate in “step-by-step” mode, in two stages, which is the ultimate teaching mode. It can also advance at two speeds, or run in the background, at the maximum speed possible in the browser.
The collection
The Actilud collection contains images of fruits and vegetables, emoticons, uppercase and lowercase letters, numbers, and some symbols. This allows you to create large programs. When writing a program, it’s a good idea to specify the collection it’s working on. For example: C={[az],[AZ],[0-9],☐} – the collection consists of the lowercase letters a to z, uppercase letters A to Z, the numbers 0 to 9, and white space.
The states
The number of states is not limited, but it does depend on the amount of memory available on your computer. For simplicity, we’ve grouped the instructions into states. Therefore, there’s no need to refer to the starting state when programming instructions, since they’re hooked to that state.
The default names (q0, q1,…) are sufficient, but it is possible to give specific names to each state.
The machines
In each instruction, you can specify, in addition to the destination state, the name of a machine to launch. Your program can therefore contain code for several machines, which can be nested: machine A launches machine B, which launches machine C…
This is the idea of the “theorem” mentioned earlier: for example, you have created a machine that decrements a natural number. You can reuse it in a machine that transforms a natural number into a sequence of sticks.
Launching a machine inside a machine is not a departure from the model: indeed, Turing demonstrated that it is possible to create a universal machine, i.e. a Turing machine that simulates the operation of a Turing machine described on the strip. But, as it’s an illusion to achieve this on our little strip of 1000 squares, I propose to launch new machines inside the instructions.
Above all, this allows code to be reused. Of course, there’s no obligation to use this feature.
If you’re a beginner, you’ll likely start by coding a single machine. You can skip the next two sections, calling machines and recursion. You’ll come back to them later, when you’re more experienced.
Calling machines
When one machine calls another, the calling machine is stored in a stack: this is a location in memory that contains each calling machine, in order of arrival. When the called machine has finished, the calling machine is popped off the stack and its execution resumes.
Up to 500 machines can be stored in the stack. Beyond this number, the program aborts with a fatal error: “stack overflow.”
A called machine always starts in its default state.
When a called machine stops “normally”, that is to say without a fatal error, it returns control to the calling machine.
The calling machine is left in the state it had when the called machine was called.
When a called machine encounters a fatal error, the entire process stops and the stack is emptied.
Recursion
Stack overflow can be a problem when using recursive formulas. However, if you put the calling machine into a halt state just before starting a new machine, the stack is not used.

The example above shows an instruction. If the head reads a 1, we must set a 1, not move, go to the “stop” state, and start the machine called “Decrement”, which we programmed elsewhere. Here the stack is not used, because there is no need to stack the current machine which is stopped just before the called machine starts.
If you use recursion, analyze your program carefully: very often, there is no need to restart the calling machine at the end of the execution of the called machine.
Stack optimization is automatic in many high-level languages; I’m thinking of course of the Javascript used on the site, but also of dear old Logo, which makes excessive use of recursion.
The instructions
As seen in the example above, everything on Actilud is visual. Instructions are handled like other objects on the site.
Special sign…
I programmed a special sign which is a small extension to the model: the ∀ sign which means “for all” or “whatever”, in math.
This sign cannot be placed on the strip; it is reserved for instructions.
 The meaning of ∀ depends on its position in the statement.
In first position, the sign ∀ means: “for any sign read” or “whatever sign is read” – so the condition is always true if the machine encounters this instruction, including for the “blank” sign.
In second position, the sign ∀ means: “write on the strip the sign read, whatever it is”.
Our instruction here therefore means: whatever sign is read, write the same sign to the tape (in other words, nothing apparently happens on the tape), go right, and stay in the same state since no state is specified.
This writing is convenient because it saves lots of lines of code. That’s why I added it. It’s compatible with the model, because the ∀ symbol replaces a series of almost identical instructions: if my collection consists of numbers from 0 to 9 and whitespace, the ∀ sign saves writing 10 instructions.
We note that after this statement, no other instructions can be executed, because it is always true. We must therefore place it at the end of the list and place the exceptions to the rule before it. Those who have already programmed a firewall will appreciate…
The two instructions below are equivalent:

In both cases, the head rewrites the cutter and moves to the left. The first writing is interesting in the Actilud interface, because when we have many objects in the same situation, we can quickly produce a batch of instructions of this type by changing the left object but leaving the ∀ sign on the right. But it is less readable than the second writing; with one more click in the editor, on the red transfer arrow, we can copy the left sign to the right position.
Often, when manipulating numbers, one must position oneself at the beginning or end of the number being studied before starting a process. Here is an example of a machine that runs through a natural number, without modifying it, until it reaches the right of the number. There is one digit per box and the digits follow one another. Initially, the head is placed somewhere on one of the digits forming the number.
Without the ∀ sign:
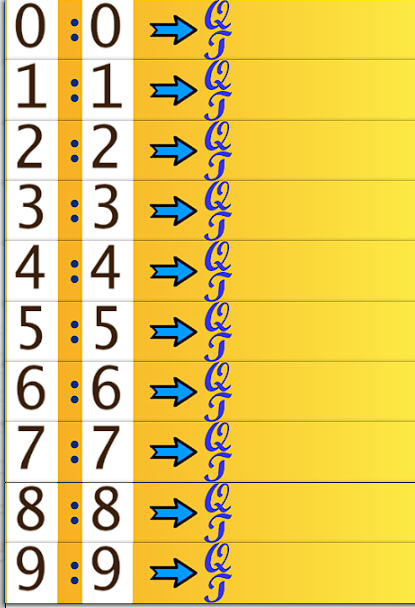
With the sign ∀:

It’s shorter, isn’t it?
Be careful though, the two programs are not entirely equivalent! It all depends on the collection!
On a collection limited to 10 numbers and white, the two programs work the same way:

But here is a case where the two programs differ!
We always start with the first number on the left, the number “2” of 24.
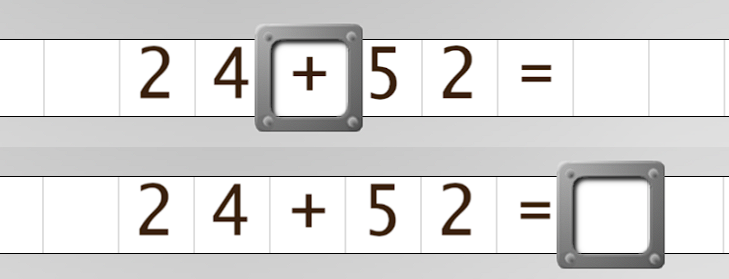
The first program, on the top strip, ends after 24, on the “+” sign, and corresponds to our wish. The second, on the bottom strip, ends at the very end of the formula, on the first blank encountered. Depending on the desired effect, this may be desirable, but it should be clearly stated in the machine description.
Listing
We can list the programmed machines in a less playful, but more compact form. The listing is not a backup because we cannot automatically recreate the machines from the listing, but it allows us to keep track of our work and, above all, to be comfortable thinking about it. We can also draw inspiration from this writing to prepare the work, or find bugs. Here is what the listing of the program gives without ∀:
Machine: [GoRight]
# Move within a natural number to the first square to the right of the number.
State: GoRight
# Moves right on each digit.
GoRight, 0 , 0 , → , GoRight
GoRight, 1 , 1 , → , GoRight
GoRight, 2 , 2 , → ,
GoRight GoRight, 3 , 3 , → ,
GoRight GoRight, 4 , 4 , → , GoRight
GoRight, 5 , 5 , → , GoRight
GoRight, 6 , 6 , → , GoRight
GoRight, 7 , 7 , → ,
GoRight GoRight, 8 , 8 , → , GoRight
GoRight, 9 , 9 , → , GoRight
To save a listing, copy and paste it into a document.
Backup
Of course, your work can be saved; go to the “Run” menu and click on the floppy disk icon. There, you can save the machines you’ve just defined and even the tape. For those in the know, the resulting file is a json-type file with a hash code, to prevent the contents of the file from being modified unintentionally; the aim is to avoid crashes if you do anything. So don’t modify the file by hand, it will be rejected.
The file is available in your device’s downloads folder.
To read a file, use the open file icon in the toolbar. There, you can choose the loading methods. A convenient option is to add the loaded machines to those already present . This makes it easy to reuse a machine in a new project.
Confidentiality
Your work takes place exclusively on the local machine. No backups are made on the server; it does not recover your data. When you make a backup, it is the program in your browser that sends the file; it is not the server.
Our challenges
You will find on the information site some suggestions for programming challenges; of course the list is not exhaustive.
Steps to program a machine
The very first step should be done on paper, with a pencil and an eraser! This is the design phase. Only seasoned programmers can do without it! So, for a beginner to use the machine properly, it is essential to carry out this preparatory work.
Setting up instructions is a three-step process. First, a machine is created. Then, within that machine, a state is created. Finally, within that state, instructions are defined.
As mentioned above, instructions are grouped into states, which simplifies testing and classification. Therefore, within an instruction, no tests are ever performed on the current state of the machine, since only instructions corresponding to the current state are executed.
You can go back and create a new state, with your own instructions, as many times as necessary. You can duplicate states, merge them. The same goes for machines. Everything is visual on the site, and thanks to numerous control buttons, programming is at least as efficient, if not more so, than with a text editor… with a little practice, of course. Watch the video below.
The instructions for use
Here’s a short , silent video in two languages to help you understand how to use the machine on Actilud. For once, it’s better and faster than a written description. If it doesn’t appear, refresh the page.
