Solver 2.0 is more powerful than the previous version. New features include solution rotation, which allows for a better understanding of the reasoning behind the solution.
Rotation of solutions
 Some players on Actilud use the step-by-step solver to learn how to solve zebra puzzles. It’s a very good idea. But it’s sometimes difficult to understand why the solver made a particular decision. This is often because the solver, even if it works step-by-step, makes a lot of decisions all at once—and it’s hard to keep track! This is particularly true for intersection, repercussion, and fusion techniques.
Reminder of how the step-by-step solver works
 Launch the solver on the game grid.
 Validate the solver changes.
 Undo the changes, first the flicker, then all the colors.
Introducing solution rotation

The solution rotation appears as a new icon in the toolbar. Clicking the icon displays the first solution; clicking again displays the next solution, and so on. When all solutions have been reviewed, the rotation resumes with the first solution, after a pause where no solutions are displayed.
Note that a solution often builds on the results of a previous solution—this is also what makes understanding difficult. The order in which you review the solutions is therefore very important; it reflects the solver’s reasoning.
The colors
As you probably know, after using the step-by-step solver, if a technique is found, the grid boxes become colored and the colors reflect the changes made.
- red indicates a false sign

- green indicates a true sign

- yellow indicates a change concerning a boolean: new boolean in a box, or replacement of one boolean by another.
These three colors do not change from the previous version. They are also not affected by the rotation of the solutions.
The borders
The solutions are explained by the borders.
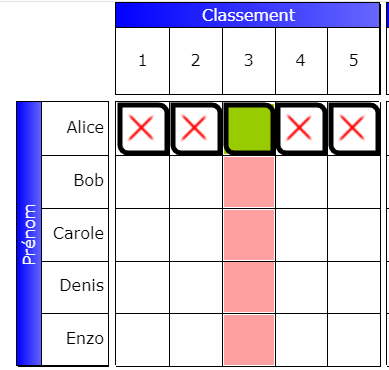
 This border designates a cell involved in an interaction ; it can be the cause or the consequence. Here is a very simple example.
In the grid above, the green cell designates a true cell that will appear following the complement technique. The cell appears because there are 4 false cells on the line. The false cells, here, are the causes of the interaction. The future true cell is the consequence. When the solver displays the first solution, the consequences are part of the colored cells, while the causes are often not colored. But be careful! Since the solver relies on previous solutions to discover new solutions, this is no longer true for the next solution! In addition, it may happen that subsequent solutions change the color of the initial cells; therefore, the causes can also be colored.
As for the red cells, they are the logical consequence of the appearance of the true cell. But here, the solver indicates nothing. Its role was to discover the true cell. Then, anything trivial is ignored to avoid overloading the explanations.
 Reference box . Typically, this box is part of an alternative and therefore contains a Boolean. Reference boxes help to understand the solver’s motivations. These boxes, when not surrounded by the border described above, do not directly intervene in the interaction, but it is because they exist that the interaction becomes possible.
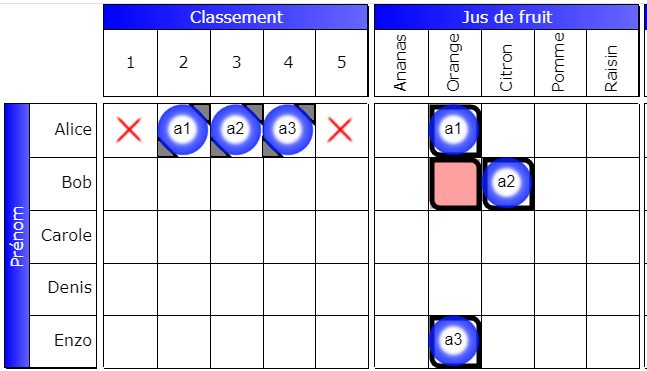
Here, we see that the box (Bob, Orange) is false, and we understand that it is because of the interaction of the three booleans a1, a2 and a3 . This box is at their intersection. But why is this possible? Look at the line (Alice, ranking “classement”) : the three booleans a1, a2, a3 form an alternative. These three booleans, in ( Alice, 2 ), ( Alice, 3 ), ( Alice, 4 ), do not intervene directly in setting the box (Bob, Orange) to false , because it is the booleans in (Alice, Orange), (Bob, Lemon) and (Enzo, Orange) which act. But it explains it: one of the three booleans in the Alice line is necessarily true. So, whatever the value of a1, a2, a3 in the grid (First name, Fruit juice), Bob does not drink orange juice.
The reference box is used in implication and invariance. The reference box undergoes the true hypothesis and the false hypothesis . The other boxes are the consequence of this test. In implication, if a consequence is a Boolean, it can take the value of the reference box. Since the reference box acts in the interaction, it is also framed by the interaction border.
 Reference box that intervenes in the interaction . This is a very common case.
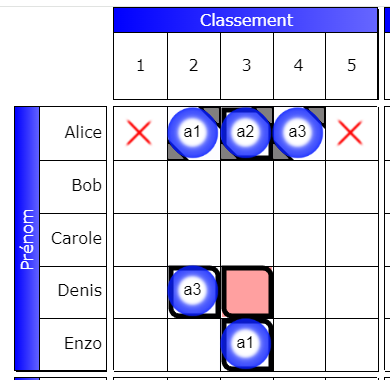 The alternative is formed by a1, a2, a3 (reference). But a2 also intervenes directly in the interaction, as well as a3 of the Denis line and a1 of the Enzo line and of course, the false box.

Pivot . A pivot is a box where two rows or columns intersect. These rows belong to two different grids than the one where the pivot is located. Pivots are found in the techniques of repercussion and merging. If the pivot is boxed, it means that it intervenes directly in the interaction, which is the most common case.
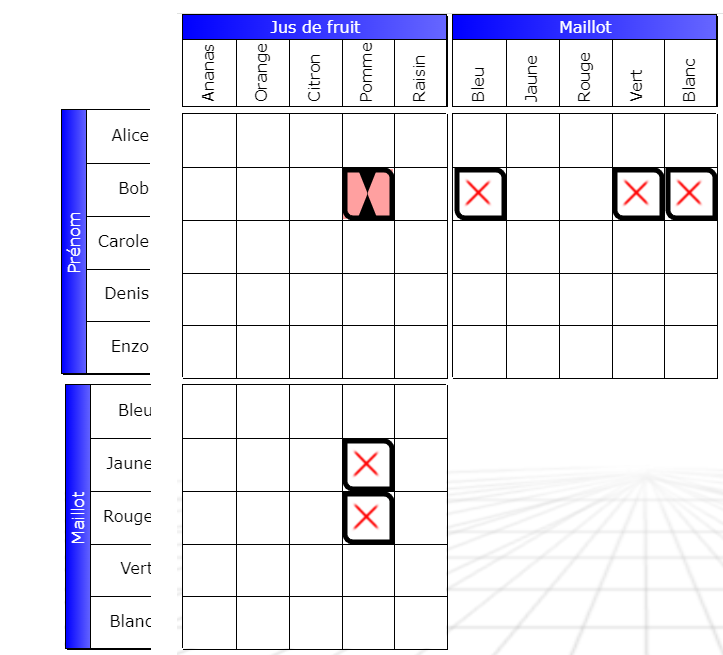
Bob doesn’t drink apple juice… because it’s impossible. The pivot, resulting from the intersection of the row (Bob, jersey) and the column ( Apple, jersey), is necessarily false. It’s easy to see why, thanks to the interacting boxes. If Bob drank apple juice, he wouldn’t be able to wear any color jersey. Here, the pivot square also plays a role in the interaction, since its passage to false is its consequence.

Since this phenomenon can occur at any time, it is not specific to a given technique. Therefore, crossed-out Booleans may appear in a technique that, a priori, has nothing to do with this. It is simply the solver signaling that it has removed the Booleans from the alternatives grid at that time.
