Do you love “Pixel Art” type puzzles? In this article, we discuss an interesting calculation technique, then we present some tools from the site that improve the gaming experience.
The Pixel Art game is located in the logic games section. There are two ways to access it: the editor, which allows you to create your own Pixel Art game, and the game itself, which allows you to play it. This article focuses solely on the Pixel Art game.
At startup, the settings are programmed to provide optimal assistance with a level 1 game, so it’s easy. Use it to get started.
Objective
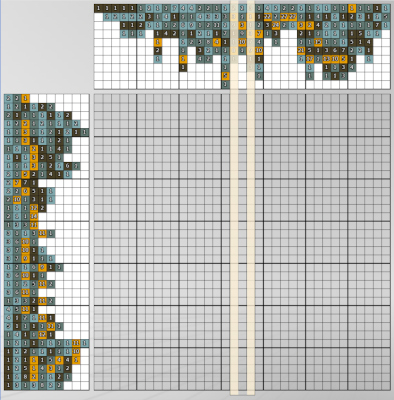
The goal is to complete the grid using the coding in the two side panels. Look at the palette of 6 colors on the right; the aim is to color all the squares using the indicated colors, except for the first one. At the beginning, all the squares are in the first color, the one marked with an eraser. This is the color assigned to “empty” squares, that is, those that have not yet been filled in. At the end of the game, no square in the grid should contain this color.
In this puzzle, the eraser is white; however, the color may vary depending on the puzzle. Generally, it’s a neutral color, distinct from other colors.
The second color, here sky blue, is the spacing between the squares. It never appears in the side panels. This color can separate two color blocks – hence the spacing symbol that appears there.
The other four colors are part of the coding: each box in the code, on the side panels, contains a number and a color: the number indicates the size of the range of contiguous squares that should be colored, and the color specifies the shade to be used.
Thus, if we look at the last row, we see that there are 8 contiguous green squares and two brown squares. Therefore, there are 10 colored squares in total. Since our grid contains exactly 10 squares, we can fill the last row completely, without using the spacing color.
Notice the small green dot on the 8 and the 2: this is the result of the automatic help we left active. It indicates that the two ranges have been placed. We will come back to this later.
In cases where the total does not equal 10, the intervals between the ranges must be filled with spaces, using the spacing color.
The whole problem is knowing where to place these spaces!
There are other rows that can be fully completed – I’ll let you discover them.
The formula for achieving it easily
In a row, to find the boxes to color when there are spaces, you have to look for the boxes that are constant in all possible distributions between color ranges and spaces. It’s tedious work. This technique is used by computers because it relies on the machine’s processing speed. For a human, it is feasible… on a different timescale. Fortunately, however, there is a more sophisticated technique.
What the machine does…
However, to fully understand our calculation formula, let’s see what the game’s very simple algorithm does. In the grid shown at the beginning of this article, let’s extract the line marked “3,2,3”:
![]()
We’re going to process it like a machine. To do this, let’s look at all the possible distributions of the color ranges (red, gray, red) and the spaces (in blue). There are 10 in total:
![]()
We observe that two cells – the third and the eighth – remain constant across all distributions. Therefore, we can safely place them in the grid:
The same result can be obtained by analyzing the situation more closely, using a fairly simple calculation: that of the uncertainty interval. The procedure involves three steps:
- calculate the range of the areas
- determine the uncertainty interval
- color!
Calculating the range of areas
The range of areas the minimum size that the sum of the areas must reach, including spaces if there are any.
The calculation is easy: add up all the sizes indicated in the row. For example, for the row containing 3, 2, 3, the size will be 3+2+3=8.
To this, we add 1 each time two areas of the same color are adjacent. This doesn’t happen in our example. But we must pay close attention to this point. Why do we need to add 1? Because if two areas of the same color are side by side in the puzzle, they must be separated by at least one space in the grid. Otherwise, the puzzle would only have one, longer area. Since our range is a minimum size, we therefore add the smallest possible amount of space: 1.
Note: we count the number of contiguities, not the number of squares!
Here is an example of coding, taken from the game “The King”.
The range here is: 1+1+1+1+1+1+2+1+3+1=13 to which we add 2 (1 for the two dark brown areas side by side and 1 for the two light brown areas side by side), for a total of 15.
In silhouette puzzles , the sum of contiguities is systematic because there are only two colors—white for space and black. The number of contiguities is the number of areas in our puzzle minus 1.
Observe the example below, taken from the weight gain game:
Here the range is 1+1+2+1+1=6 to which we add 4, for a total of 10. Indeed, there are 4 contiguities (5 ranges -1).
Since our grid is 10 squares long, we can place the ranges and spaces without making a mistake because there is only one solution:
![]()
Here is how to do the calculations. Count from the left or right, whichever is easier, and mentally add up the value of the range each time you skip a square. Then go back, adding 1 for each square you skip when they are contiguous, which is always the case in “silhouette” puzzles.
This illustration explains the calculation process. The blue arrows indicate the direction of additions; the red ones indicate the direction of increments at each contiguous areas.
![]()
Of course, we can save the return phase (red arrows) by adding 1 to each contiguity in the blue phase.
If the range is equal to the row size, we can complete it immediately. But what do we do when the range is smaller? Well, in that case, we calculate the uncertainty interval.
Calculating the uncertainty interval
Easy :
uncertainty interval = row size – range
In the example of the king above, the range of our row is 15 and the row measures 35 squares. The uncertainty interval is therefore 35 – 15 = 20.
Color the boxes
The rule: anything that exceeds the uncertainty interval can be colored.
Let’s start right away with a case taken from the penalty shootout puzzle.
![]()
Here the range is 8 (3+4+1 contiguity) and the interval is 2 (10-8). Anything longer than 2 can be displayed.
To place the colored squares, we count the squares from 1 each time a new range begins. If the count exceeds the uncertainty interval, we color the square in the range color. Once we have reached the length of the range, we check if the next range is the same color. If so, we skip a space (without coloring, since we are below the interval). Then we repeat this process with the next range.
The illustration below clearly shows the mental process to follow. As you can see, it’s counting. As soon as I go over 2, the value of the interval, presto! I color it in.
![]()
The hyphen in the illustration symbolizes space.
Let’s return to the little house riddle.
![]()
The range is 8 (3+2+3) and therefore the interval is 2 (10-8).
This is what we get: squares 3 and 8 of the row are red. And you can see that the result is the same as our previous algorithm, but obtained in a more “human” way.
Applying the technique to a portion of the row
Of course, as the game progresses, squares will fill up. The squares near the edges are the most interesting. Therefore, it may happen during the game that you have definitively placed some ranges, but others remain to be placed in the row. In this case, only count what lies within the new space, and to calculate the uncertainty interval, do not take the size of the entire row, but only the size of the area to be studied, from which you subtract the extent of the ranges within it.
Observation, by example
The formula is good, but it’s even better if you complement it with a little observation.
Let’s look at the next row, extracted from a game in which some boxes are already filled.
![]()
If the previous formula is applied to the entire row, it is not possible to fill the grid. Indeed, our formula gives an uncertainty interval of 11, which is far above all the values of the enigma.
But… we can fill 28 boxes!
Let’s look at the two dark green boxes on the row. There are, in the enigma, three areas of this color: the first, size 2, the third, size 1, and the last, size 4:
![]()
The first green square in the row is at the beginning, in second position in the row. It therefore corresponds to the first area of the enigma, that of size 2.
So we have two possibilities for the last green square of the row: either it corresponds, on the enigma, to the green area of size1, or to the green area of size 4.
If it corresponds to the green area of size 1, then, behind it, it is necessary to leave enough space to process the following squares of the enigma, so at least 1+4+3+3+3+4=18 squares. Now we see that there are only 13 free squares left… So, our green box can not correspond in the enigma to area of size 1.

This already allows us to color 10 squares in the spacing color. Indeed, assuming that our green box is at the beginning of the 4-box range, it still needs 3 empty squares to expand. We can color with certainty 10 squares from the end of the row.
![]()
Now let’s look at the yellow box. Does it belong to the “yellow 4” or “yellow 3” case of the enigma? By analyzing the situation, we see that it can only belong to the “yellow 3” situation.
![]()
We could make a few more changes to certain boxes. However, with a little practice, we realize that when trying to fill in the row starting from the ninth box, after the one marked “blue 1” in the puzzle, there is only one possible solution:
![]()
Try it. You will see that it is not possible to do otherwise.
Additional information: the edges
The edges are an interesting approach. Always examine them because if you can place squares at the edges, you can validate the rows that touch those edges. An example is the game of King, where the bottom row can be easily solved.
Once this bottom row is in place, certain areas at the bottom of the columns can be filled in, those for which we placed the last square. But I’ll let you discover that for yourself.
Some tools
 The eyedropper
The eyedropper tool allows you to change a color. It’s provided in case you have trouble distinguishing certain shades. Feel free to use it if you need to.
Click on the eyedropper, click on a color, choose the setting, click on the eyedropper again to exit eyedropper mode.

 Undo / redo
The two classic icons for changing your mind… and for changing your mind after you’ve changed your mind. Note that memory is limited; it only stores a few moves. The tool only applies to played moves, not to color changes or clearing the entire grid.
 The calculator
Ideally, you’d do without it; you’ll be much faster with mental arithmetic. This game is an excellent practice.
 The eraser
This allows you to completely clear the grid and start over on a blank one. It also cancels the list of actions to undo/redo.
 Save, load
Allows you to save the current game to the downloads folder, and retrieve it later to play.
 The crossed-out traffic light
Allows you to stop the flickering when there are errors.
The guide rulers
The rulers appear when you click within a panel. You can move them by clicking elsewhere, using the arrow keys on your keyboard, or the mouse wheel. To hide them, click in the empty corner at the top left, between the panels.
Rulers are especially useful on large grids, where it becomes difficult to follow a line or column along its entire length.
The guide rulers
Guide rulers make it easier to write a color within the grid squares. They are especially useful on large grids, where it becomes difficult to follow a line or column along its entire length. In game mode, there are three settings available in the toolbar:

Guide rulers disabled

Enables simple guide rulers. These sliders are useful on a computer, provided the screen is large enough to comfortably use the grid. They allow you to easily identify the row where you are modifying the cells.

Enables magnifying guide rulers. These sliders slightly enlarge the grid cells and reproduce, next to the row being studied, the information found in the left or top panel. Use them if the grid cells are too small to edit comfortably.
Click the corresponding icon in the toolbar several times to choose your preferred setting. In “edit” mode, only simple rulers are available.
The rulers appear when you click in a panel. You can move them by clicking elsewhere in a panel, or, using the keyboard and mouse, by pressing the arrow keys or the mouse wheel. To hide them, click in the empty top-left corner between the panels. You can also use the “Delete” or “Esc” key. The “Home” and “End” keys move the rulers to the beginning and/or end of the grid.
To color one or more squares
There are two methods for choosing the color.
- Click on one of the colors in the palette – that’s what it’s designed for! The pencil-shaped cursor indicates the current color.
- When you’re unsure about a shade, you can also click in one of the panels on the area you intend to fill in the grid. The color of the clicked cell is then selected, and the palette reflects your choice. This also displays a ruler.
To color a cell, once you’ve chosen a color, simply click inside it (unless the color is already in the cell– see below). You can move the pointer while holding down the mouse button – or drag your finger across the touchscreen – which allows you to color an area. In this mode, you cannot drag to adjacent rows.
To clear a cell, you can select the first color on the palette and click on the cell. You can also use a handy toggle effect. If you click on a cell with the same color as the one already present in it, the cell is cleared. If you click again, the original color returns.
The help
There are two forms of assistance :
- on-the-fly help, which occurs as soon as a cell is modified;
- help on demand, useful when you need a helping hand.
![]() The settings are configured in the starting menu; you can return to it at any time to modify them .
The settings are configured in the starting menu; you can return to it at any time to modify them .
On-the-fly assistance
- Indicating incorrect squares: if a square is colored the wrong color, it will start to flicker. The program performs a direct comparison with the model in memory; this feature helps prevent mistakes, but it also makes cheating easier.
- Check the clues (very useful): In the side panels, check the squares whose ranges are plausibly placed in the grid, even if these ranges aren’t actually in the correct position. A square is checked if it corresponds to a complete range and if that range is in a plausible position. This help is really useful and I recommend it: automatically checking plausible ranges simplifies the reading of puzzles without giving away the underlying pattern. When you’re playing a magazine puzzle, with a pencil and eraser, that’s what you usually do yourself.
 On-demand assistance
- Find errors: Works like the on-the-fly help, but covers the entire grid. Finds erroneous squares by comparison with the model. Helps avoid mistakes when an inconsistency is suspected.
- Find errors and highlight interesting rows:
- If an error is detected, the previous case applies.
- If there are no errors, an interesting row is marked with a ruler. The advisor displays the number of squares to be colored in the row, or indicates whether it is possible to complete the entire row.
If possible, always progress as far as you can, first from the edges, then from the other rows you have already completed. On large grids, the solver may take several seconds to find the most interesting row, as it compares all the combinations across all rows before making its choice.
The grid level
Don’t hesitate to save your game to resume it later. The concentration required to solve the complex puzzles is intense! To give you an idea of the difficulty, the game level indicated in the menu is actually the number of passes the algorithm makes when testing a puzzle. Since a pass is a complete loop through all the clues on both panels, and the Coco puzzle required 19 passes, there were 1330 evaluations. Of course, you won’t do nearly as many—at least I hope not—because we humans are capable of discerning the most useful rows and columns without calculation. Don’t hesitate to use the on-demand help, especially when you’re stuck. It makes the game more enjoyable without revealing everything.